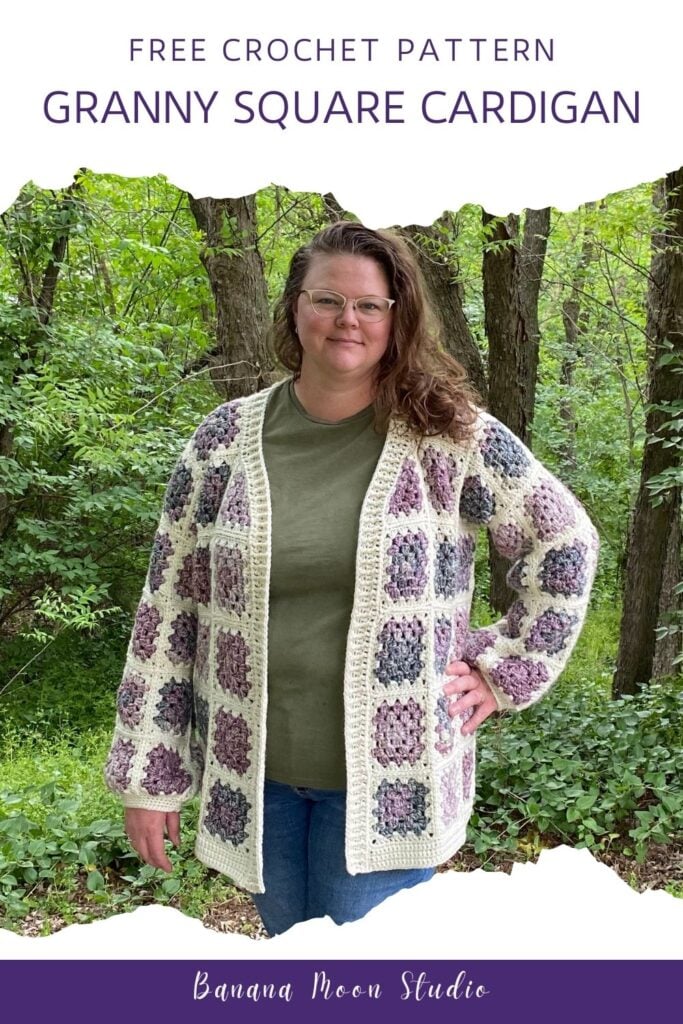
Free Crochet Granny Square Cardigan Pattern
Granny square cardigan crochet pattern
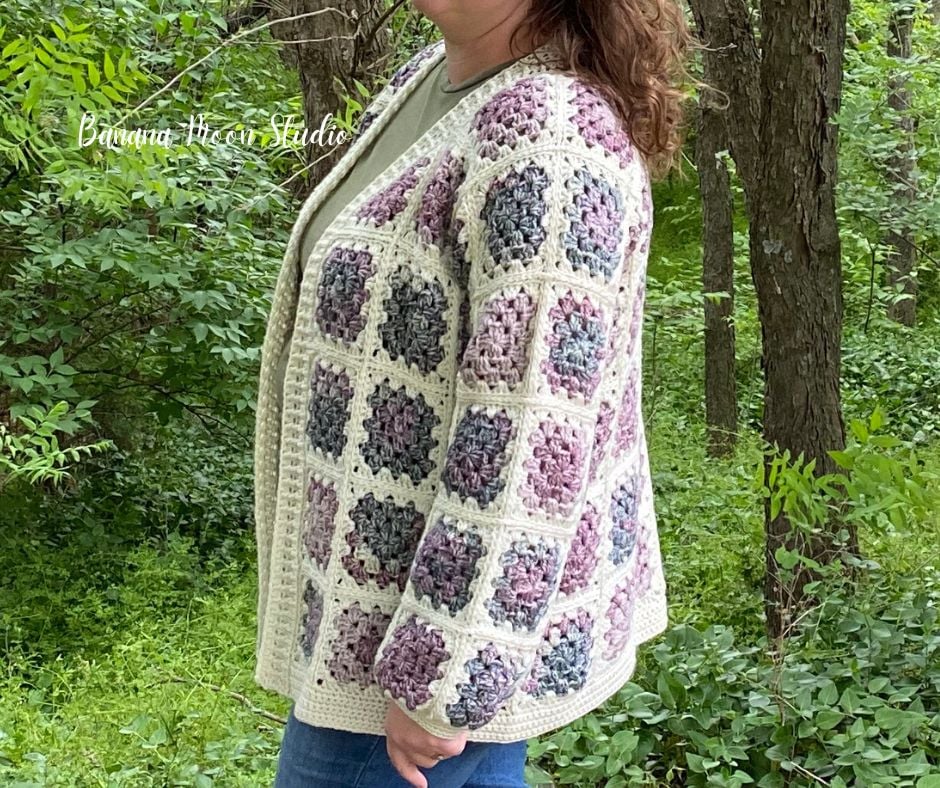
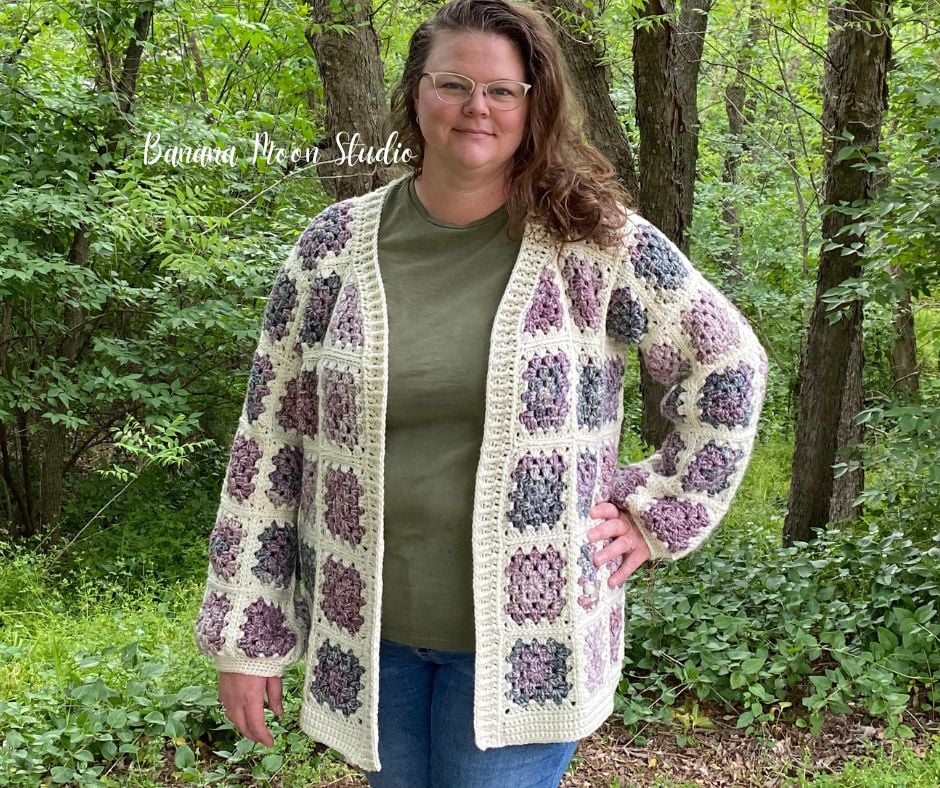
Granny square cardigans are all the rage lately, and with good reason! They are casual and cozy and filled with color. This version uses a cake yarn for the first three rounds of the square, so you can get some color change without changing colors every round. Then that color is complimented by the cream outer round and matching joining and edging.
This post may contain affiliate links. If you click one and make a purchase, I will earn a small commission at no additional cost to you. See my disclosure for details.
Table of Contents
Granny square crochet patterns
Granny squares are a really traditional crochet pattern. They were most definitely around in the 70s when my husband’s aunt was crocheting them into blankets. They were probably around long before that.
For a lot of crocheters, they are one of the first things they learn how to make. Me? I didn’t actually crochet a granny square for the first time until a few years ago.
What is a granny square exactly? We see that term used a lot in the crochet world. Some people use this term to refer to any crochet square. Some use it to refer to any square that begins in the center and works outward. Technically speaking though, a granny square uses the exact stitch pattern of the squares used in this cardigan, and everything else is just a crochet square or crochet motif.
If you are just looking for the instructions and a video tutorial for a basic, traditional granny square, you can find that here.
The Classic Granny Square Crochet Pattern Collection
This granny square cardigan crochet pattern is part of the Classic Granny Square Crochet Pattern Collection, a group of six crochet patterns that all use traditional granny squares to make beautiful crochet projects that you and your family will love!
Each of the six crochet patterns in the Classic Granny Square Crochet Pattern Collection is, or will be, available free, ad-supported here on my website. You can also purchase each crochet pattern in the collection individually in my Etsy or Ravelry shop.
Or you can purchase the entire collection and get all six granny square crochet patterns at a discount!
You will need to sign up for my free newsletter with an email address in order to access the full, free pattern. If you decide to use the free version, please bookmark this page and come back to it when you work on your project rather than trying to print or screenshot the page. Your time on this page helps me get paid for my work, so thank you!
If you prefer an ad-free option, you can purchase an inexpensive PDF of this pattern. It’s available both as an individual pattern, or as part of my Classic Granny Square Crochet Pattern Collection in both my Etsy and Ravelry shops.
Or find the free, ad-supported versions of the other crochet patterns in the Classic Granny Square Collection at the links below.
Kingfisher Granny Square Blanket
What materials do I need to crochet this cardigan?
For the Gracemont Cardigan, which includes four sizes for adults, you will need a few things.
First up, yarn. I used Cascade Yarns Pacific Prints for the center of the granny squares. This is a cake yarn that changes colors all on its own, so you can get some color changes within each square without adding more ends to weave in. Believe me, granny square projects have enough of those as it is. I used #606 Eggplant.
For the last round of each square, the joining, and the edging, I used Cascade Yarns Pacific #01 Cream. Pacific is a soft, lovely, worsted weight blend of acrylic and Merino superwash, so this will make your cardigan easy care, you can machine wash and dry it. Cascade Yarns Pacific can be purchased through your local yarn shop. If they don’t have it in stock, they can order it for you.
Next up, you’ll need a crochet hook for this crochet granny square cardigan pattern. I used a K (6.5 mm) crochet hook for most of the cardigan. For the sleeve edging, I also briefly used J (6 mm) and I (5.5 mm) hooks. If you need to adjust hook sizes to make gauge, then you’ll want to adjust all three hook sizes. If, for instance, you need to move up to an L (7 mm) for your squares, then use K and J for the sleeve edging.
My favorite crochet hooks are Furl’s Streamline Resin. They are lightweight, have an inline hook shape, and have a thick, ergonomic handle.
I use and love Furl’s Resin Streamline crochet hooks!

In addition to those basics, you’ll need a couple of locking stitch markers for the edging and a tapestry needle.

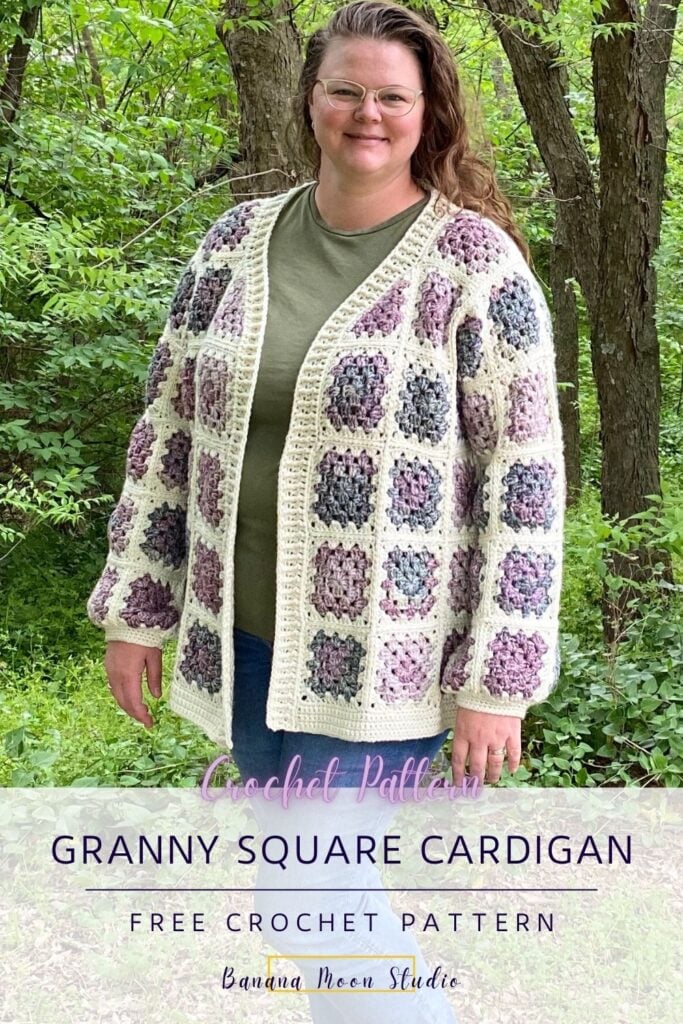
Gracemont Cardigan, a crochet granny square cardigan pattern
By April Garwood of Banana Moon Studio
(C)2025 April Garwood. As with all my patterns, please do not make paper or digital copies for others. Instead, please direct them to my website to get their own. Thank you!
Difficulty Level: Intermediate
Available Sizes: 1 [2, 3, 4]
Finished Measurements: Chest circumference 39 ¼ [43 ½, 56 ¾, 61 ¼] inches; Length 25 ¾ [25 ¾, 28, 28] inches. Need additional measurements? The paid PDF includes a schematic with additional measurements.
Yarn: Cascade Yarns Pacific Pacific and Pacific Prints (60% Acrylic, 40% Superwash Merino; 213 yds; 100 g; yarn weight category 4/Medium/Worsted): 700 [780, 1050, 1135] yds #01 Cream (color A), 720 [810, 1110, 1210] yds #606 Eggplant (color B).
Crochet Hook: K (6.5 mm) for squares and joining, J (6 mm) and I (5.5 mm) for edging, or sizes needed to obtain gauge.
I use and love Furl’s Resin Streamline crochet hooks!
Notions:
Gauge: 4 rnds of Granny Square pattern below = 4 1/2 inches across.
Notes
This pattern uses standard US terms. For help with abbreviations, get my free, printable crochet abbreviations list here.
See this tutorial post for help with basic crochet stitches.
This video will show you how to crochet a basic granny square.
For a demonstration of the joining method, see this tutorial.
See this tutorial for help with post stitches, used in the edging.
Notes About Fit
The sweater shown in the photos is a size 3 worn with about 7 inches of ease.
Sizes 2 and 4 are shaped a little differently at the front opening than the cardigan in the pictures. This is due to the number of squares needed around the circumference to create this size of cardigan. Also, the neck opening is more narrow in these sizes and the edging may sit upright along the side of your neck.
The sleeve lengths may feel a little long for shorter individuals. If the sleeve seems too long, leave off the last row of squares and add length to the cuff if needed to get the desired length.
Special Stitches
Single crochet 2 stitches together (sc2tog): Insert hook in first designated st, yo, pull up a loop, insert hook in second designated st, yo, pull up a loop, yo, pull through all 3 loops.
Double crochet 2 stitches together (dc2tog): Yo, insert hook in first designated st, yo, pull up a loop, yo, pull through 2 loops, yo, insert hook in second designated st, yo, pull up a loop, yo, pull through 2 loops, yo, pull through all 3 loops.
Front post double crochet (fpdc): Yo, beginning on front side of fabric, insert hook around post of designated st from right to left, yo, pull up a loop, [yo, pull through 2 loops] 2 times.
Back post double crochet (bpdc): Yo, beginning on back side of fabric, insert hook around post of designated st from right to left, yo, pull up a loop, [yo, pull through 2 loops] 2 times.
Cardigan
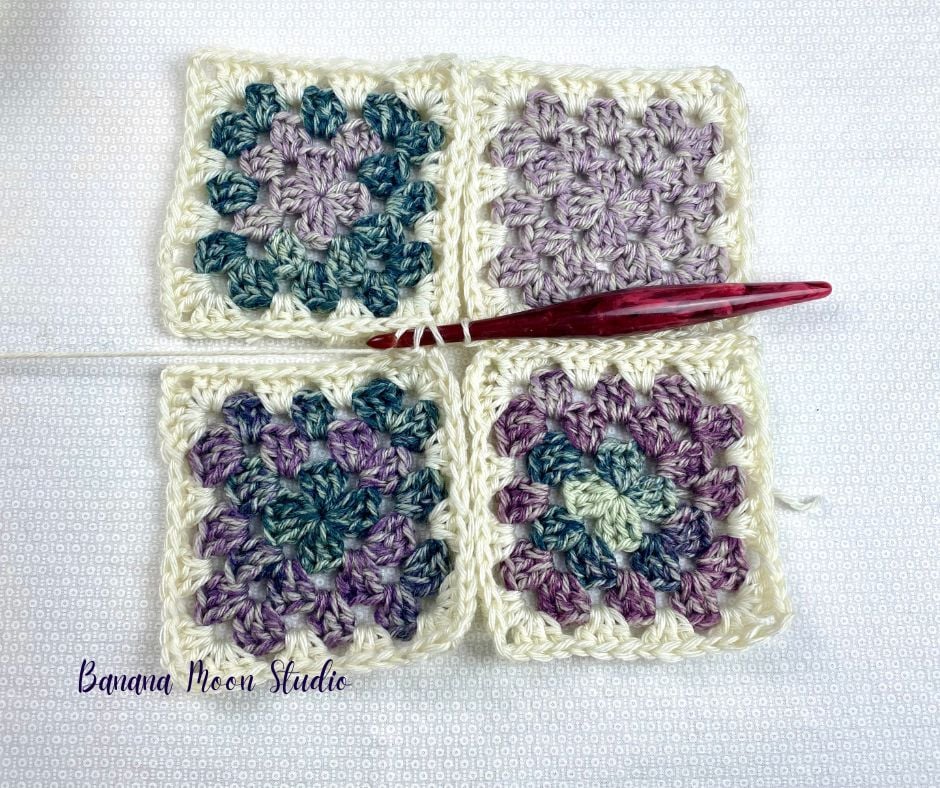
Granny Square (make 64 [73, 100, 110])
With B and largest hook, make a Magic Ring by wrapping the yarn around the first two fingers of your right hand one full time. With your left hand, carefully grab both strands where they meet and pull the ring off your right fingers, place your hook through this ring, yarn over, pull up a loop, and you are ready to begin Rnd 1.
Rnd 1: Ch 2 (does not count as a st throughout), [3 dc in ring, ch 2] 3 times, 3 dc in ring, pull tail of Magic Ring to close, hdc in first st to join (hdc counts as corner ch-sp) – 12 dc.
Rnd 2: Ch 2, 3 dc in corner ch-sp, *skip next 3 sts, (3 dc, ch 2, 3 dc) in next corner ch-sp, repeat from * 2 more times, skip next 3 sts, 3 dc in next corner ch sp, hdc in first st to join – 24 dc.
Rnd 3: Ch 2, 3 dc in corner ch-sp, *3 dc in each sp between 3-dc groups to next corner ch-sp, skipping sts between the sps, (3 dc, ch 2, 3 dc) in next corner ch-sp, repeat from * 2 more times, 3 dc in each sp between 3-dc groups to next corner ch-sp, skipping sts between the sps, 3 dc in next corner ch-sp, hdc in first st to join – 36 dc. Fasten off B,
Rnd 4: With A, (sl st, ch 2, 3 dc) in first corner ch-sp, *3 dc in each sp between 3-dc groups to next corner ch-sp, skipping sts between the sps, (3 dc, ch 2, 3 dc) in next corner ch-sp, repeat from * 2 more times, 3 dc in each sp between 3-dc groups to next corner ch-sp, skipping sts between the sps, 3 dc in next corner ch-sp, hdc in first st to join – 48 dc. Fasten off.
Triangular Half Granny Square (make 2 [0, 2, 0])
With B and largest hook, make a Magic Ring.
Row 1: Ch 2 (does not count as a st throughout), (4 dc, ch 2, 4 dc) in circle, turn – 8 dc.
Row 2: Ch 2, dc in first st, 3 dc in sp between first 2 sts, skip next 3 sts, (3 dc, ch 2, 3 dc) in ch-sp, skip next 3 sts, 3 dc in sp between last 2 sts, dc in last st, turn – 14 dc.
Row 3: Ch 2, dc in first st, 3 dc in sp between first 2 sts, skip next 3 sts, 3 dc in next sp between 3-dc groups, skip next 3 sts, (3 dc, ch 2, 3 dc) in ch-sp, skip next 3 sts, 3 dc in next sp between 3-dc groups, skip next 3 sts, 3 dc in sp between last 2 sts, dc in last st, turn. Fasten off B – 20 dc.
Row 4: With A (sl st, ch 2, dc) in first st, 3 dc in sp between first 2 sts, [skip next 3 sts, 3 dc in next sp between 3-dc groups] 2 times, skip next 3 sts, (3 dc, ch 2, 3 dc) in ch-sp, [skip next 3 sts, 3 dc in next sp between 3-dc groups] 2 times, skip next 3 sts, 3 dc in sp between last 2 sts, dc in last st – 26 dc. Fasten off.
Block all of your squares before joining.
Joining
This portion of the pattern is available to email subscribers only. Click the box below to unlock this exclusive subscribers-only content with a free email subscription. Add your email and create a password. If you are having trouble, reset your password or login to Grow.
I love sharing crochet and knitting patterns with you! Please don’t copy, paste, or distribute this pattern. Want an ad-free version? Purchase an inexpensive PDF digital pattern from Ravelry or Etsy. I appreciate your reading, buying, and using my patterns! Because of you, I can keep designing.
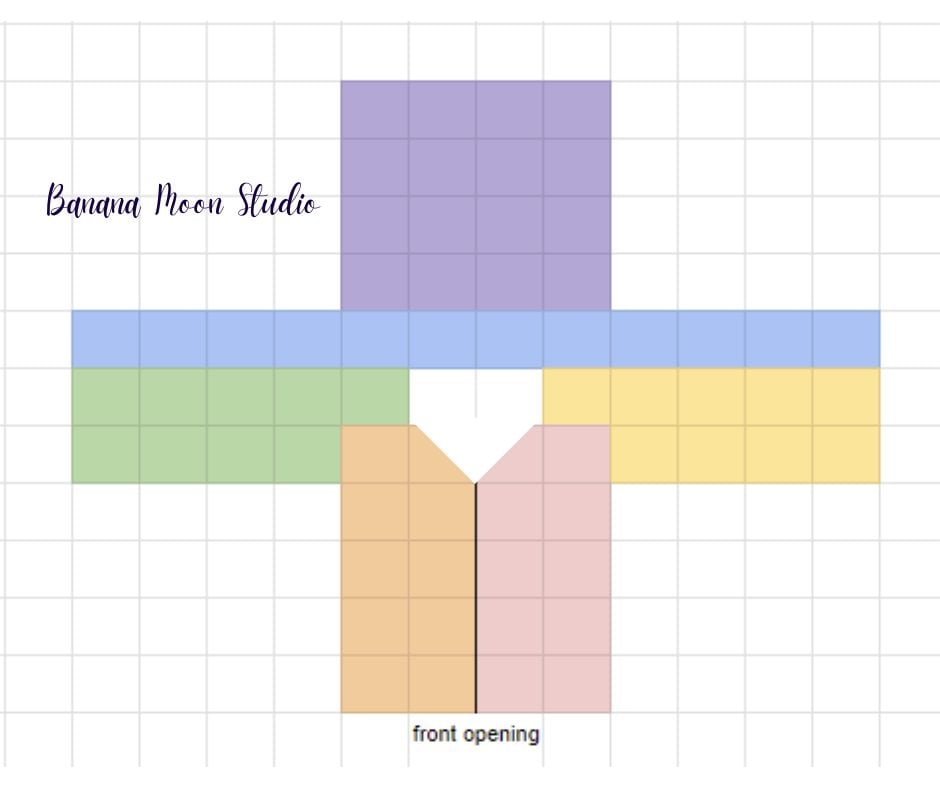
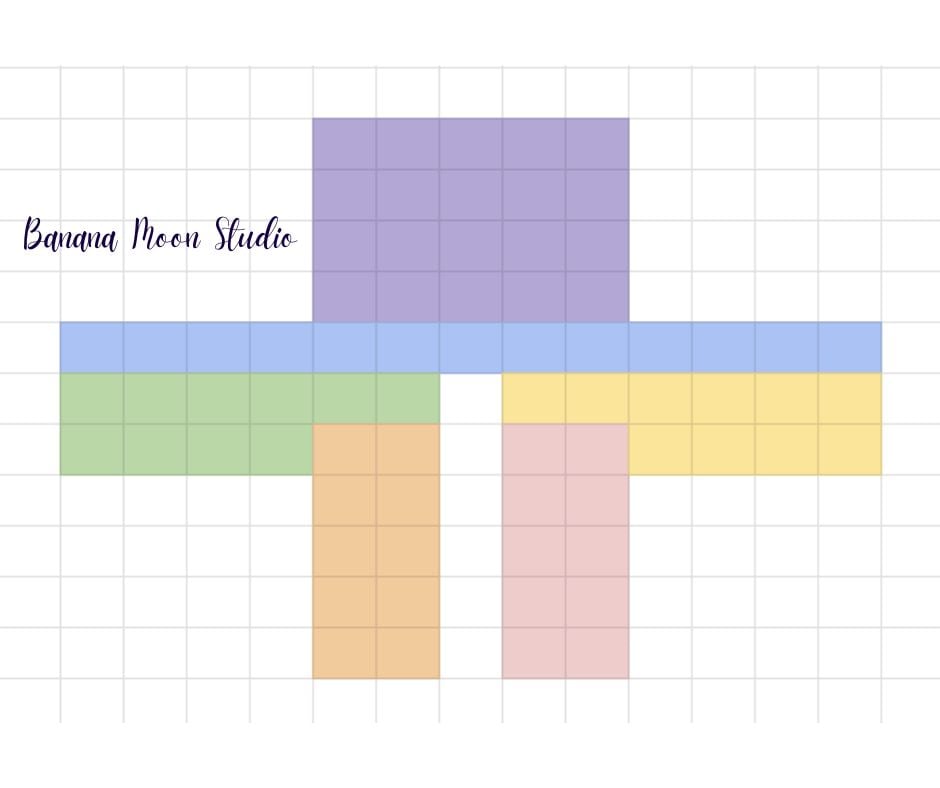
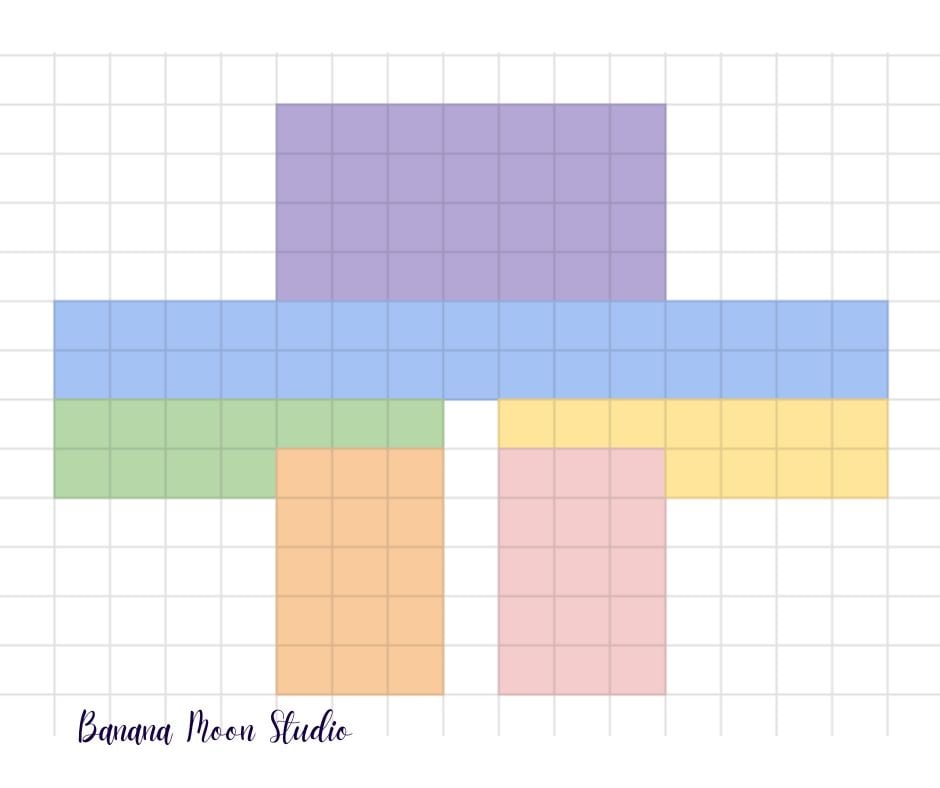
Follow the included diagrams to see how to arrange the squares for your cardigan. For this first step, you will only be working the joins that move horizontally across the diagram, always beginning on the right side of the diagram, and working toward the left side (for left-handed crocheters, work from left to right).
After you have joined all of the squares together working horizontally across the sweater, you will turn the sweater 90 degrees and join the columns.
In the diagram, the pink section will be joined together first. Next, assemble the orange section. Then you will put together the yellow section, joining the 1 [2, 2, 3] yellow squares that are above the pink section to the top of the pink section. Then join the 1 [2, 2, 3] green squares to the top of the orange section and continue joining the rest of the green section from there. Then join the row(s) of blue squares. Then add each row of the purple section.
I suggest using the flat slip stitch joining method, but you can use a different method if you prefer.
Flat Slip Stitch Join
While joining, always insert hook through chains and stitches from front to back.
The chains of corner chain spaces will be joined along with the side to which they are closest. Each side has 12 stitches, but the joining for each side will include 14 slip stitches, because you will include one chain at each end from the corner chain spaces.
Place first square of first row on a flat surface in front of you with RS up. Place first square of second row also RS up in front of you above the first square so that the line between them runs horizontally across your flat surface. Make a slip knot in yarn and place it on hook.
Insert hook through back loop of first ch of first corner ch sp of top square, insert hook through back loop of second ch of first corner ch sp of bottom square, yo, pull through both chs and loop on hook. As you continue, keep working-yarn below squares and hook so that as you work, you are pulling the working yarn from underneath your join.
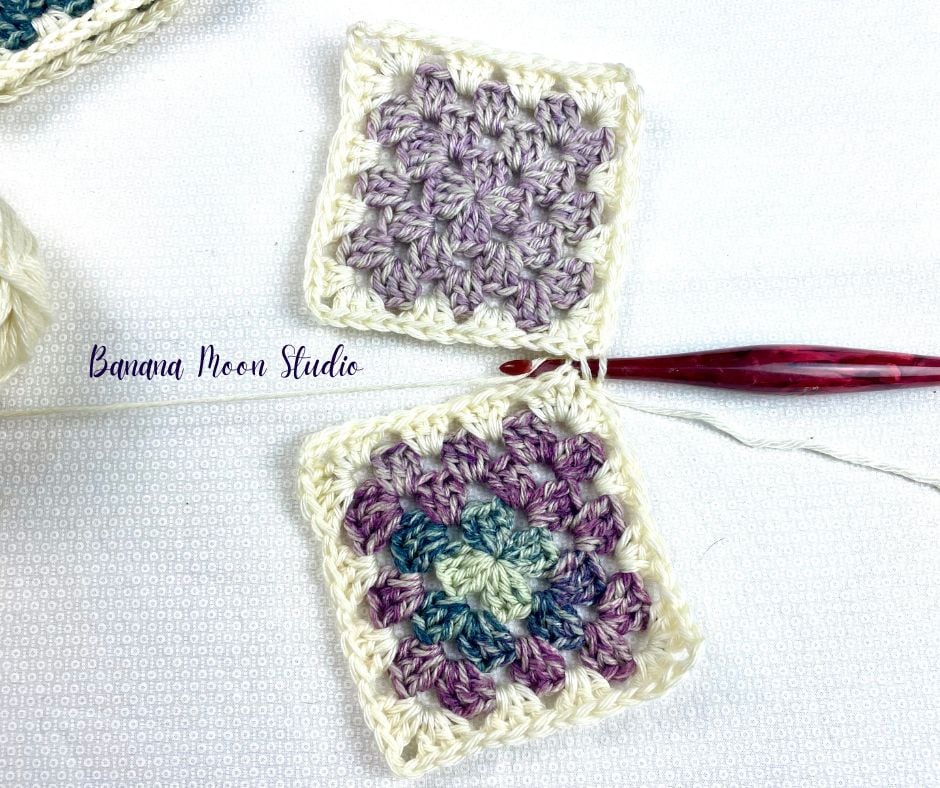
*Insert hook through back loop of next st of bottom square, insert hook through back loop of next st of top square, yo, pull through both sts and loop on hook, insert hook through back loop of next st of top square, insert hook through back loop of next st of bottom square, yo, pull through both sts and loop on hook, repeat from * across in every st and corner ch, working each corner ch with the side to which it is closest.
After you join one set of squares, ch 1, and continue right on to join the next set of squares in order in the two rows.
When you have completed joining all the squares in those two rows, fasten off. Then join in order all the squares of the third row to those of the second row, and so on, always working joins in the same direction across the sweater.
Continue in this way until all the rows of squares are joined together.
Then, turn the piece 90 degrees and join the columns of squares in the same manner, working each column of joining in the same direction as all other columns.
Each time you come to a corner, you will ch 1 and continue to the next set of squares, letting the chain and the working yarn travel over the perpendicular join.

Once all of the squares are joined together, fold the sweater in half, WS together, bringing front and back bottom edges even, and bottom edges of sleeves even.
Use the flat slip stitch join, or your preferred method, to join the seam from bottom edge, to armpit, to sleeve edge on one side of the sweater, and then on the other, fastening off at each sleeve edge.
Diagrams
Size 1
Size 2
Size 3
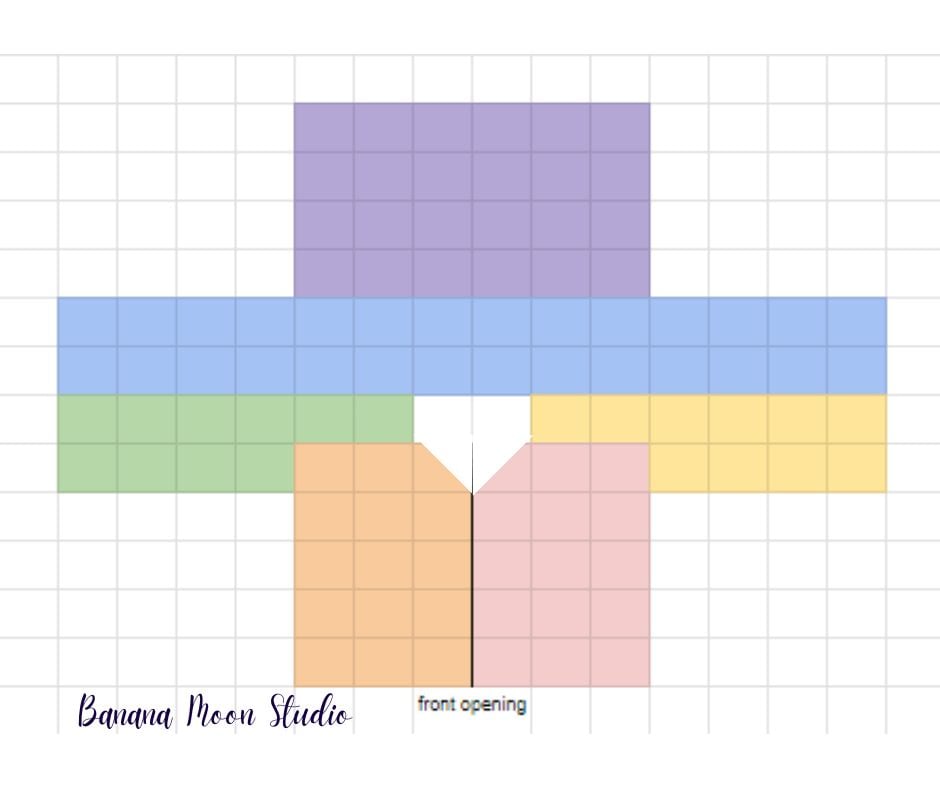
Size 4
Edging
Sleeve Edging
Rnd 1: With A and medium hook, with RS facing, join in corner ch-sp right next to underarm seam with sc, place marker in first st and move up into first st of each rnd as work progresses, (sc, skip next st, sc) in each group of 3 dc to next corner ch-sp*, sc in next 2 corner ch-sps, repeat from * around, ending last repeat at **, sc in last corner ch-sp, do not join or turn – 30 [30, 40, 40] sc.
Rnd 2: Switch to smallest hook, sc in each st around, do not join or turn.
Rnds 3-5: Repeat Rnd 2.
Rnd 6: Sl st in first 3 sts. Fasten off.
Bottom Edging
Row 1: With A and largest hook, with RS facing, join with sc at left bottom corner in ch-sp (or right bottom corner for left-handed crocheters), sc in same corner ch-sp, *sc in each st to next corner ch-sp**, [2 sc in corner ch-sp] 2 times, repeat from * across to last corner ch-sp, ending last repeat at **, 2 sc in last corner ch-sp, turn – 128 [144, 192, 208] sc.
Rows 2-7: Ch 1, sc in each st across, turn. Fasten off.
Front and Neck Edging
Note: In Row 1, you will need an even number of stitches between the beginning of the row and the first decrease at the back of the neckline, not counting the decrease. Between the two decreases at the back of the neckline you will need an even number of stitches, not counting the decreases. Between the second decrease at the neckline and the end of the row, you will need an odd number of stitches, not counting the decrease.
Row 1 (RS): With A and largest hook, starting at right bottom corner of front opening (or left bottom corner for left-handed crocheters), with RS facing, (join with sc, sc) in first ch-sp, sc evenly up front opening and side of neckline, sc2tog at first back corner of neckline, sc evenly across back of neckline, sc2tog at next back corner of neckline, sc evenly along side of neckline and down front opening to bottom corner, turn. See note above about numbers of sts needed. Place locking st markers at both decreases along back edge of neckline.
Row 2: Ch 2 (does not count as a st), *dc in each st to 1 st before next marker, dc2tog with one leg of st in each of 2 sts on either side of marker, skipping the marked st between them, replace marker in the resulting st, repeat from * 1 more time, dc in each remaining st, turn – 4 sts dec’d.
Row 3: Ch 2, hdc in first st, *[fpdc in next st, hdc in next st] to next marker, skip marked st, repeat from * 1 more time, [fpdc in next st, hdc in next st] to end of row, turn – 2 sts dec’d.
Row 4: Ch 2, hdc in first st, [bpdc in next st, hdc in next st] to end of row, turn.
Row 5: Ch 2, hdc in first st, [fpdc in next st, hdc in next st] to end of row. Fasten off.
Finishing
Weave in all ends. Block to measurements. Finished!
And that finishes this crochet granny square cardigan pattern. I would LOVE to see your in-process and finished cardigans! You can share them on Instagram and tag me, or you can join my Facebook group and share them there.
Happy crocheting!

Save this for later with Pinterest!


I don’t see a purple sign up box after clicking on download here
Sending you an email.
I don’t seem to be able to find the place to get the free pdf. I’ve been up, down, up, down…
The download button is near the bottom of the post, close to my signature. Click the download button, then follow the directions on the next page. I will send you an email as well.
Can’t find download button.
Sorry, Frieda, but the download was only free on October 10th. If you check the event roundup, you can find today’s free pattern and get that download. Or you can purchase the cardigan pattern using the buttons here in this post.
Why does it have to be so complicated to get a free pattern?
I made the granny squares and clicked on the exclusive free content. Can’t find the instructions to crochet the squares together. Please advise.
After you click on the exclusive free content box, you will need to login with your email address to get the joining instructions. I’m sorry that it’s complicated, but I do need to get something in exchange for the free pattern since this is a business. Thanks for your support!