Free Crochet Zipper Pouch Pattern

Free crochet zipper pouch pattern
This cute crochet zipper pouch pattern uses four granny squares attached together. Add a zipper and a lining and you have a retro-inspired zipper bag to hold your crochet hooks, glasses, colored pencils, or notions.
This post may contain affiliate links. If you click one and make a purchase, I will earn a small commission at no additional cost to you. See my disclosure for details.
Table of Contents

What materials do I need to crochet zipper pouch?
First up, you will need yarn. The free pattern in this post really could be made with any yarn. I chose to use Universal Yarn Uptown DK, a premium 100% acrylic yarn. If you choose to use a thicker or thinner yarn than I did, change your hook size accordingly.
I used very small amounts of colors #130 Donahue (light gray), #101 White, and #146 Aqua.
You will also need a crochet hook. I used a size H (5 mm).
I use and love Furl’s Resin Streamline crochet hooks!

You will also need a tapestry needle for weaving in your ends.
This project will also require some additional materials. You will need enough cotton fabric to line the wrong side of your granny squares, or your crochet zipper pouch will have holes in it. I purchased a fat quarter and that was plenty. If you are going to make your pouch the same size as mine, you’ll need two pieces of fabric about 9 inches x 5 inches.
You will also need thread to match the color of yarn you plan to use for the outermost round of your squares and a sewing needle or sewing machine if you prefer that. And lastly, a 9 inch long all purpose zipper.
What skills will I need to use to crochet this zipper pouch?
This zipper pouch is made out of four basic granny squares that are attached together. I use a magic ring to begin my granny squares. You can find a magic ring tutorial here.
You will be using double crochet stitches, chains, and half double crochet stitches to make the granny square. You can find video tutorials for 7 basic crochet stitches here.
Or if you prefer, I have a full video for traditional granny squares here that will show you all of those skills and stitches in one video.
You will also need to join the squares together in groups of two. You can use any method, but I used and recommend the flat slip stitch join, which you can learn in this tutorial post.
There will also be sewing in this crochet zipper pouch project. You can use a sewing machine if you are comfortable with that. I chose to sew mine by hand. I have a fair amount of sewing machine experience, but didn’t feel sure that I wouldn’t stretch the crochet fabric all out of shape.
Granny Fest Blog Hop & CAL
This granny square pouch pattern is featured in Granny Fest 2025 blog hop and crochet along! This fun event features 18 granny stitch and granny square projects. One will be featured each day starting on January 15, 2025 and going through February 1.
The crochet along, or CAL continues through February 14 with participants gathering in the Granny Fest Facebook group to share their projects, meet friends, chat, and meet the designers.
If you would like to participate in Granny Fest, the first step is to visit the event roundup. Choose a granny stitch or granny square project from the 18 featured patterns.
The Classic Granny Square Crochet Pattern Collection
This granny square pouch crochet pattern is part of the Classic Granny Square Crochet Pattern Collection, a group of six crochet patterns that all use traditional granny squares to make beautiful crochet projects that you and your family will love!
Each of the six crochet patterns in the Classic Granny Square Crochet Pattern Collection is, or will be, available free, ad-supported here on my website. You can also purchase each crochet pattern in the collection individually in my Etsy or Ravelry shop.
Or you can purchase the entire collection and get all six granny square crochet patterns at a discount!
You will need to sign up for my free newsletter with an email address in order to access the full, free pattern. If you decide to use the free version, please bookmark this page and come back to it when you work on your project rather than trying to print or screenshot the page. Your time on this page helps me get paid for my work, so thank you!
If you prefer an ad-free option, you can purchase an inexpensive PDF of this pattern. It’s available both as an individual pattern, or as part of my Classic Granny Square Crochet Pattern Collection in both my Etsy and Ravelry shops.
Or find the free, ad-supported versions of the other crochet patterns in the Classic Granny Square Collection at the links below.
Kingfisher Granny Square Blanket

Zena Zipper Pouch, a Crochet Zipper Pouch Pattern
By April Garwood of Banana Moon Studio
(C)2025 April Garwood. As with all my patterns, please do not make paper or digital copies for others. Instead, please direct them to my website to get their own. Thank you!
Finished Measurements: About 8 1/2 inches x 4 1/2 inches.
Yarn: Universal Yarn Uptown DK (100% Acrylic; 273 yds; 100 g; yarn weight category: 3/DK/light): 38 yds#101 White (color A), 16 yds #146 Aqua (color B), 21 yds #130 Donahue (color C).
Crochet Hook: H (5 mm), or size needed to match gauge.
I use and love Furl’s Resin Streamline crochet hooks!
Notions:
Sewing needle
Thread to match yarn color A
Two pieces of cotton fabric 5 inches x 8 3/4 inches each
All-purpose 9 inch zipper to match yarn color A
Gauge: 4 rnds of granny square = About 4 inches.
Notes
This pattern uses standard US terms. For help with abbreviations, get my free, printable crochet abbreviations list here.
See this tutorial post for help with basic crochet stitches.
See this video tutorial for help crocheting granny squares.
See this video tutorial for help with the flat slip stitch joining of squares.
Granny Square (make 4)
With A, make a Magic Ring by wrapping the yarn around the first two fingers of your dominant hand one full time. With your other hand, carefully grab both strands where they meet and pull the ring off your fingers, place your hook through this ring, yarn over, pull up a loop, and you are ready to begin Rnd 1.
Rnd 1: Ch 2 (does not count as a st), [3 dc in ring, ch 2] 3 times, 3 dc in ring, pull tail of Magic Ring to close center hole, hdc in first st to join (hdc counts as corner ch-sp) – 12 dc. Fasten off A.
Rnd 2: With B, join with sl st in first corner ch-sp, ch 2, 3 dc in corner ch-sp, *skip next 3 sts, (3 dc, ch 2, 3 dc) in next corner ch-sp, repeat from * 2 more times, skip next 3 sts, 3 dc in next corner ch-sp, hdc in first st to join – 24 dc. Fasten off B.
Rnd 3: With C, join with sl st in first corner ch-sp, ch 2, 3 dc in corner ch-sp, *3 dc in each sp between 3-dc groups to next corner ch-sp, skipping sts between the sps, (3 dc, ch 2, 3 dc) in next corner ch-sp, repeat from * 2 more times, 3 dc in each sp between 3-dc groups to next corner ch-sp, skipping sts between the sps, 3 dc in next corner ch-sp, hdc in first st to join – 36 dc. Fasten off C.
Rnd 4: With A, repeat Rnd 3 – 48 dc. Fasten off.
Joining Squares
You will join the granny squares into 2 groups of 2 squares each.
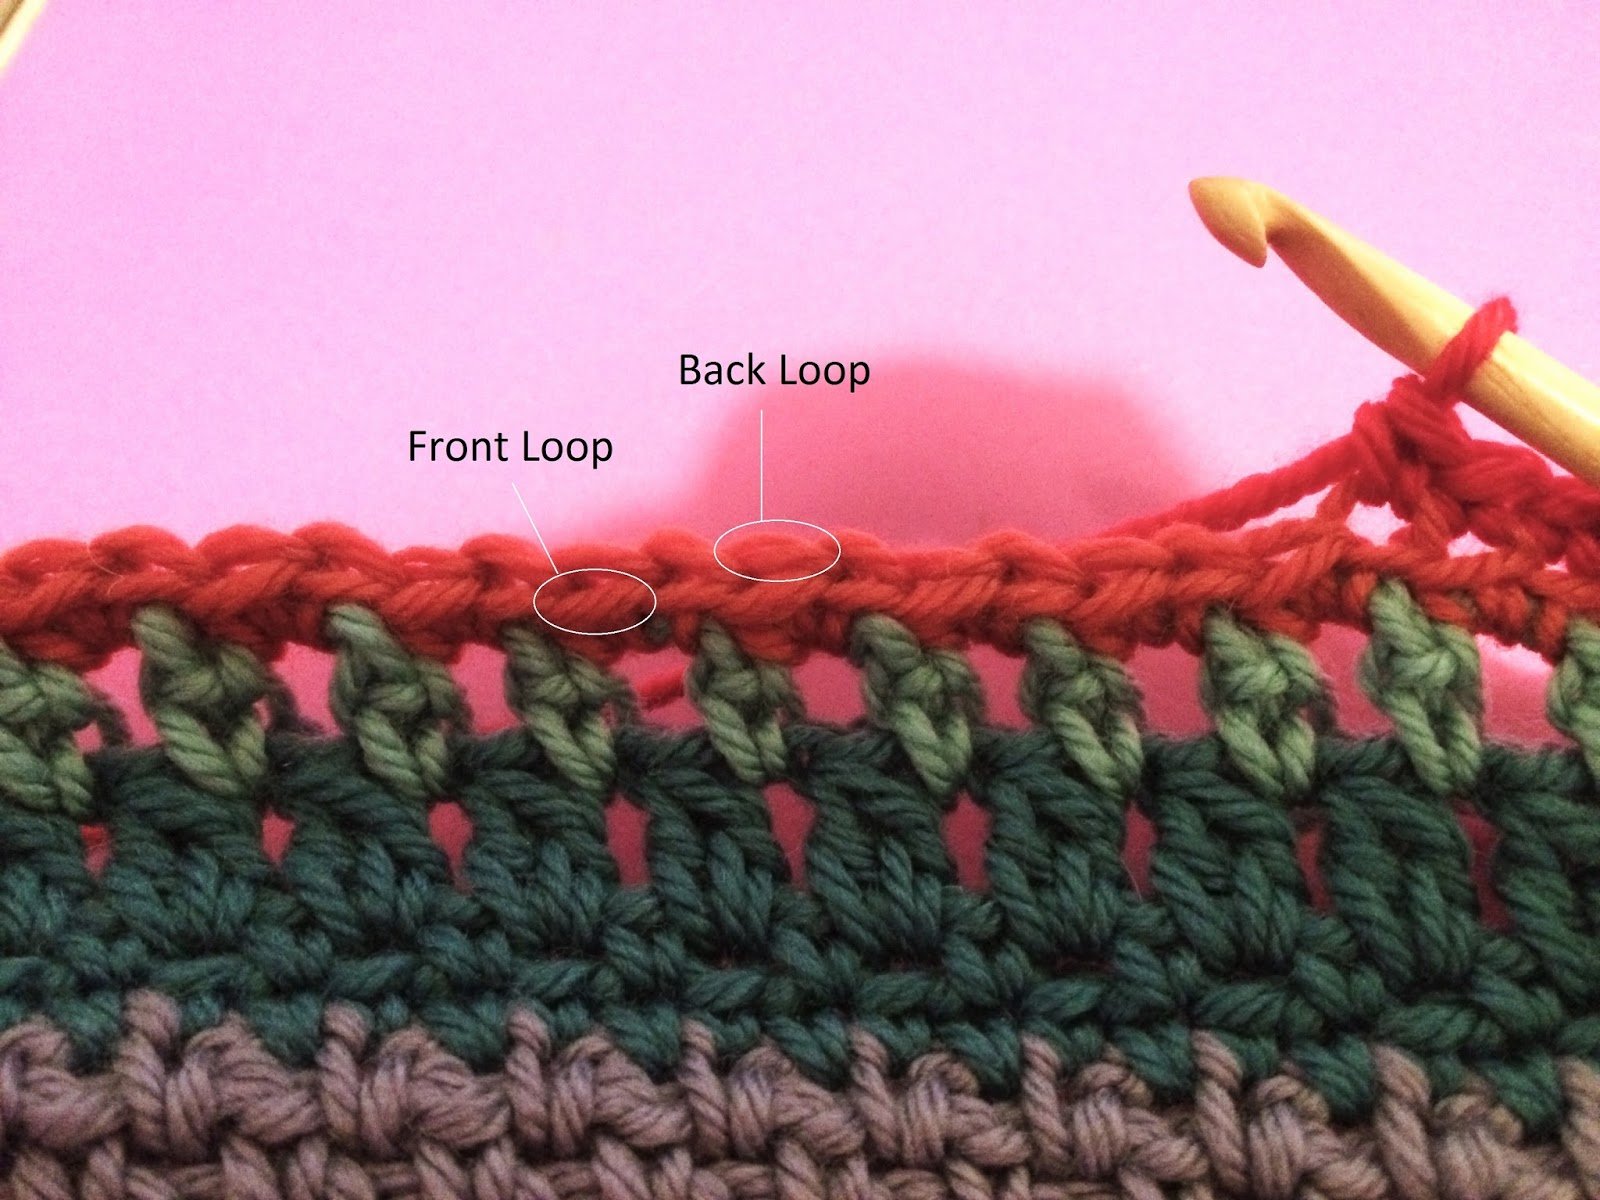
As you join the squares, all squares will face RS up at all times. You will insert your hook through only the back loops of all stitches and chains, starting from the RS.
Place 2 squares in front of you with one side of each lined up, RS up, one square above the other so that the line between the two of them runs horizontally in front of you.
With A, place a slip knot on your hook. Always keep working-yarn below squares and hook so that as you work, you are pulling the working yarn from underneath your join.
*Insert hook through first ch of corner ch-sp of top square, insert hook through second ch of corner ch-sp of bottom square, sl st, [insert hook through next st of bottom square, insert hook through next st of top square, sl st, insert hook through next st of top square, insert hook through next st of bottom square, sl st] across to next corner ch-sp, insert hook through next ch of bottom square, insert hook through next ch of top square – 14 sl sts. Fasten off.
Edging Square Sets
This portion of the pattern is available to email subscribers only. Click the box below to unlock this exclusive subscribers-only content with a free email subscription. Add your email and create a password. If you are having trouble, reset your password or login to Grow.
I love sharing crochet and knitting patterns with you! Please don’t copy, paste, or distribute this pattern. Want an ad-free version? Purchase an inexpensive PDF digital pattern from Ravelry or Etsy. I appreciate your reading, buying, and using my patterns! Because of you, I can keep designing.
Each set of 2 squares will need to be edged as follows.
Rnd 1: With A join with sc in one outside corner ch-sp, *sc in next 12 sts, [2 sc in next corner ch-sp] 2 times, sc in next 12 sts, 3 sc in next corner ch-sp, sc in next 12 sts**, 3 sc in next corner ch-sp, repeat from * to **, 2 sc in next corner ch-sp, join to first st with sl st – 92 sts. Fasten off.
Weave in all ends.
Zipper

Remove the 9 inch all-purpose zipper from its packaging. Lay it horizontally in front of you, RS up. Place one set of granny squares RS up with the top edge laying alongside the zipper, overlapping the zipper tape. You want the zipper pull to be just inside the side edge of the squares.
There will be extra zipper and zipper tape sticking out at each end. Leave about 1/2 inch extra zipper tape at each end, cutting off excess if necessary (you can cut right through the zipper teeth with good fabric scissors if needed). Fold the extra over and angle it out slightly away from the zipper so it won’t get caught.
One at a time, use sewing thread and needle to sew the top edges of the granny square sets to the zipper tape along with the folded over portions at each end.
Sorry about my messy stitching here. Just like with yarn ends, you should weave in your thread ends. When I finish sewing, I make a double knot in my thread and then weave in about one inch through the zipper tape before cutting off the thread.

Lining
With each piece of fabric you will fold the edges over toward the WS of the fabric. Fold over about 1/4 inch along each edge. You may have to adjust the folded amount slightly, if necessary to make the piece fit just right. If you like, you can iron the folded edges so that they will stay easily while you sew.

Using sewing needle and thread, sew one fabric piece to one set of granny squares WS together, keeping both loops of edging sts free along both short sides and bottom edge. Along the top edge, make sure that the edge of the fabric overlaps the zipper tape, but is far enough away from the zipper teeth so it won’t get caught.
If you really hate sewing, you could try using fabric glue to put in the zipper and lining, but I make no promises that this will turn out well as I have not tried it. In theory, it seems like it should work out fine to go this route, but it also seems to me like it could get…messy.

Joining Side and Bottom Edges
Fold the sets of squares together, lining sides facing, zipper pull on the outside. I recommend weaving in about 6 inches of the end of your seaming yarn before you begin whipstitching.
Whipstitch the pieces together starting at the top of one side edge and working around the sides and bottom to the top of the other side edge.
Weave in all ends. Finished!

That finishes up this crochet zipper pouch pattern! I would love to see your in-process or finished projects! You can share them on Instagram and tag me, or you can join my Facebook group and share them there.
Happy crocheting!

Save this for later with Pinterest!