Spring Creek Jumper Pleats

(C) Interweave Crochet
My Spring Creek Jumper was originally published in Interweave Crochet, Winter 2010. It’s an adorable girl’s jumper with simple cables on both sides, a pleat at the waist, and a ruffled edging on the bottom. I’ve been asked some questions for help with Round 1 of the skirt, which is where you set up the pleats in both the front and back of the Spring Creek Jumper. It was a little tricky to figure out a good way to write the instructions for this round, so I’m sure that it could be a little tricky reading it. The important thing to remember is that when you turn your work mid-round, what was the front becomes the back, and what was the back becomes the front.
This round begins with a certain number of stitches that you work in hdc, then the cable, then a certain number of stitches also worked in plain hdc. (Pardon my bright green compression gloves, I’ve been fighting through some tendinitis).

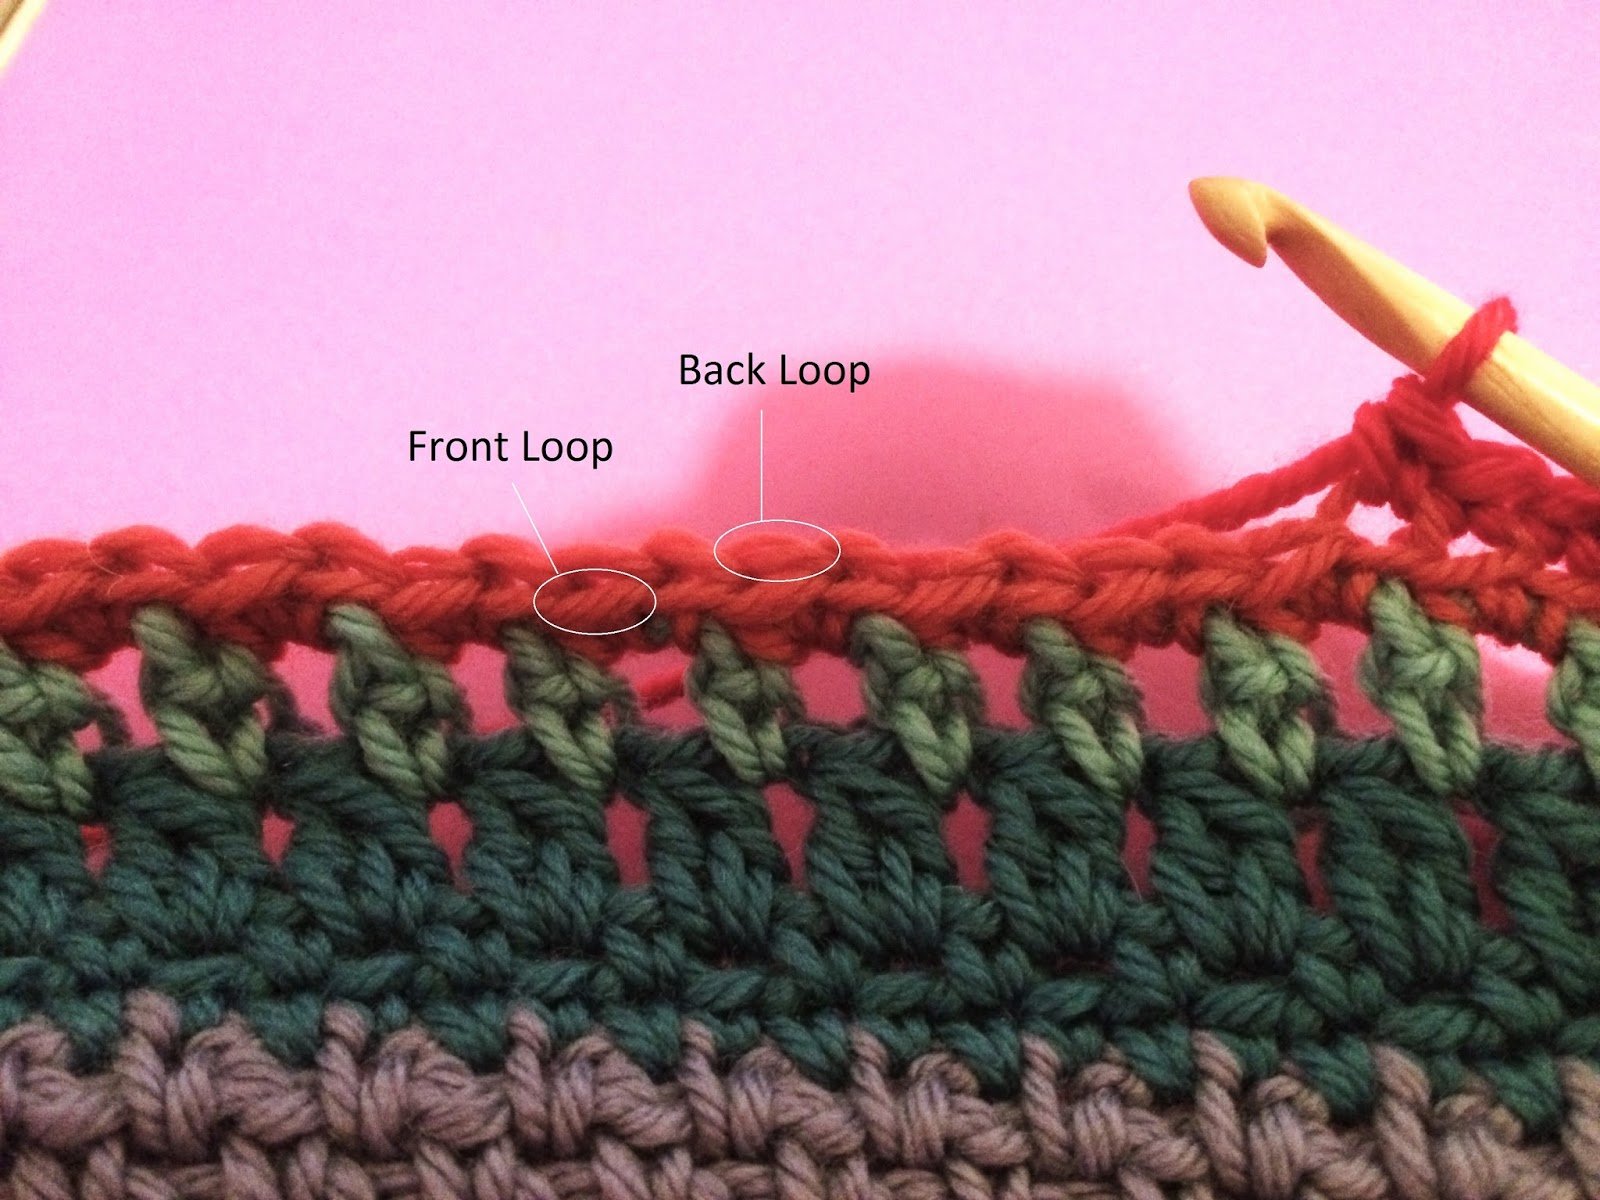
So, at this point we’re ready to start the “hdc flo in next 5 sts”. As you can see, each stitch has two loops that make a sideways “V”. I’ve turned the swatch on its side here so that you can see them, but when the swatch is upright one of the loops is the front loop and the other is the back loop. “flo” means “front loop only” so…

…you are going to work the next 5 hdc in only the front loop of the stitch below them.

When you finish those five, you can turn the swatch forward slightly and see the 5 back loops that you didn’t work into on the back at the bottom of the 5 stitches you just worked, as in the picture above.

At this point you “turn work” so that you are ready to work into the unworked loop of the stitches you just worked into. Now that you’ve turned your work, they are the front loop, whereas they were the back loop before.

So, the instructions say to “hdc flo in 5 sts just worked”. The above picture is showing the hook inserted into the first front loop to work the hdc.

And this is how the swatch looks from the top after you work those 5 stitches.

Then the instruction says to “turn work, hdc blo in 5 sts just worked by working in same lp and just to the left of last 5 sts worked”. When you turn this time, the 5 loops you just worked into are now the back loop again, so when the instruction says “hdc blo” that means you are working into the exact same loop you just did, so it says “working in same lp and just to the left of last 5 sts…”. Look at the bottom of the last 5 stitches you worked and find the loop that you worked them into. Then insert your hook front to back and just to the left of the previous stitch into the same loop, You will probably need to have your swatch laying flat with the wrong side up, or even turned sideways as in the picture above to get at that loop the right way.

When you finish this 3rd set of 5 stitches your swatch has a Z-shape when looked at from the top. Congrats! You’re half-way through the pleat! The rest of it is going to be just like this in reverse.

So, we hdc blo in the next 5 stitches.

And when we finish that, it looks like this. You can see the unworked front loops on the front of the swatch.

Then, you turn your work, and work into the same loops as the last 5 stitches, again, this is easier to get at when your swatch is flat, this time with the right side up, or turned sideways like this. Technically, since we have turned our work this loop is now the front loop rather than the back loop, so this is why the instruction says “hdc flo in same lp and just to the left of last 5 sts worked”. Find the loop you worked into at the bottom of the last 5 stitches you worked and insert your hook from the wrong side of the fabric to the right side and just to the left of the previous stitch worked into it.

When you finish that step, the top of your swatch should look like the picture above.

Now we “turn work” so that it looks like the picture above.

The above picture shows my hook inserted into the front loop, ready to work an hdc flo where the instruction says “hdc flo in first 5 sts”. After you work those 5 stitches you finish off this section by working a specified number of stitches as regular hdc in both loops of the stitch under it.

It looks like this from the right side of the fabric.

And like this from the working edge of the fabric. In the next few rounds of the jumper you will have to turn your work a bit as you work across the tops of the stitches in order, but after a few rounds the pleated part of the fabric will relax out and you’ll just be working round after round of the same thing for the specified number of rounds — smooth sailing!
Wrapping up:
As you can see, I couldn’t have put that lengthy of an explanation into typical abbreviated pattern language. I hope that this helps everyone through that round smoothly. I’m always happy to help, so leave a comment if you still have an unanswered question. As always, I would love to hear from you!
(Notice that band-aid on my left index finger? I tried to cut off the end of my finger a few days ago . The cut happens to be right where my yarn goes over my index finger, so I have to where a band-aid to crochet anything. This cut was fairly deep and really hurts! Thank goodness I didn’t manage to cut it off. It would have been very difficult to crochet without that portion of finger).
If you’d like to try this pattern, get it by clicking HERE.
Happy crocheting!


Would you be willing to email me a copy of the pattern? Strictly for personal use? I have two granddaughters I would love to make the a dress.
I'm so glad that you like it Wakerens! This pattern was published in Interweave Crochet, Winter 2010. You can buy the magazine at many yarn, craft, and book stores for less than $10. You can also order it at https://interweavestore.com. Because of my contract and copyright laws I am not permitted to give out this pattern to anyone, but I hope you are able to get a copy of the magazine and that you enjoy making it!
Hi, I just purchase your wonderful Spring Creek Jumper pattern. I have problems with the Behind Cable: How to make a FPdc in skipped sts while working behind stitches that I just made? It sounds like I am actually making a BPdc? I'd appreciate any help.
You will actually make a Front Post stitch because of the direction that you go around the post of the stitch. But, in order to get to that stitch, your hook will pass behind the 2 sts you just made, rather than in front of them. So, look at the 2 sts you just made, I kind of pull mine down a little and out of my way, reach back to the skipped sts, go around them front front, to back, to front, and work the st. If I were going in front of them, then I just go across the front of those sts to get to the skipped ones. This is difficult to explain. If I can find the time tomorrow I will take some pictures of this and post them in a new blog post for you.
Thank you for getting back to me so quickly. If I understand it correctly, the only difference between the behind and front cable is in the 'twist' one makes to the loop on the hook when reaching back to the skipped sts. Is that correct? It would be great if you have time to post some pictures.
Leena, I posted a video in a new blog post. It isn't fantastic quality-wise, but I hope it's good enough. Let me know if it helps you or not. Thanks!
Hi April, thank you so much for the quick video response. You explained and showed very clearly the difference between the Front and Behind cables. Thanks!